How to manage and secure your NetScaler infrastructure in Azure with NetScaler MAS Service from the Citrix Cloud
Throughout the year, Citrix changed their release strategy to Cloud-first / multi-Cloud, which they announced at Synergy. One of the first results of this strategy choice is the release of NetScaler Management and Analytics System (or MAS in short) in the Citrix Cloud.
Every NetScaler administrator in the field (needs to) know that standardisations and monitoring are essentials parts to successfully manage and build any physical MPX, SDX and/or VPX NetScaler infrastructure. With NetScaler MAS, Citrix gives you the ability to detect pain points, SSL security risks, the creation Master Configurations templates – perform automation tasks and Stylesheets for faster and standardised deployments – with some simple steps to follow. Let Citrix (Cloud) take care of the pre-installation, maintenance and updates of the platform and you only need to add configure and add you’re NetScalers appliances, wherever they are active on Microsoft Azure – Amazon AWS or in the local on-premises datacenter environment. In the Netherlands, we call that a WIN – WIN for both.
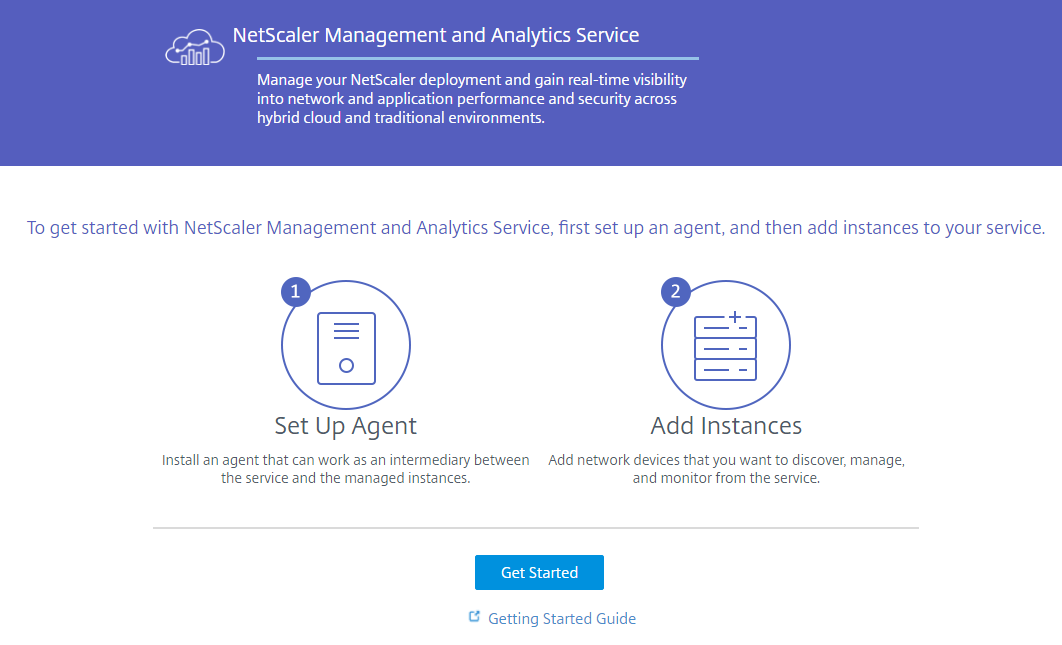
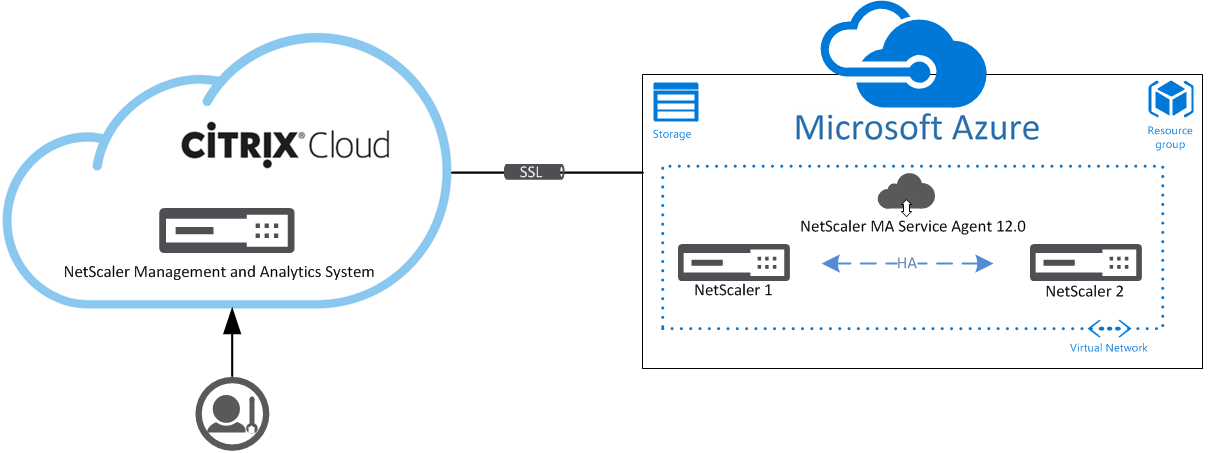
How it actually works (from the Citrix docs page) “NetScaler MA Service is available as a service on the Citrix Cloud. After you sign up for Citrix cloud and start using this service, you have to install agents in your network environment, and then add the instances you want to manage to the service.”
In this article, I’ll show you how easy you can deploy NetScaler Management and Analytics System from inside the Citrix Cloud. The installation and activation process of the NetScaler MA Service Agent 12.0 in Microsoft Azure, the add process of an Azure NetScaler VPX instance to the MAS configuration, some great automation stuff – MasterConfiguration, activation of the HDX AppFlow rules for XA and XD environments, and some extra options and tips to take full advantage of MAS!
Table of Contents
Click on the title to get forwarded in the article:
Register for a (Citrix Cloud) trial account
Add and configure the MAS v12 agent appliance in Azure
Add the NetScaler instance in Azure
Upgrading your NetScaler(s) via NetScaler MAS
HDX Insight and GW Insight for XenApp and XenDesktop ICA sessions
Some facts about MAS…
It can automate critical provisioning, configuration, logging, policy enforcement and management tasks!
The service includes all the HDX Insight and GW Insight functionalities, which can be used by XA/XD admins to get end-to-end visibility to ICA traffic and to manage, monitor and audit all HDX traffic associated with XenDesktop and XenApp environmentsin a very cost-effective way (AppFlow)
Use analytics to turn the data into insights for application performance management, troubleshooting and security threat mitigation.
NetScaler Management and Analytics System can help to improve configuration workflows by automating NetScaler systems. One of NetScaler MAS’ mechanisms to do so is called Configuration Jobs (see more hands-on explained at the end of the article).
The ability to create rich sets of data about apps, users and devices for applications deployed on-premises and in (hybrid) cloud environments, Amazon AWS and/or Microsoft Azure for example.
It provides the possibility to map applications to infrastructure so that applications can always be managed end-to-end wherever they are deployed.
Access a powerful set of dashboards to see summarized and detailed performance and security threat information per application.
The direct link to NetScaler MAS in the Citrix Cloud which can be found at – http://netscalermas.cloud.com
It is all based on the latest NetScaler MAS v12.0 software build, so you’re always ensured to have the latest features available!
Get full visibility to user authentication issues, end-point check failures, and single sign-on failures for application traffic.
Pricing is started from $90,- annually per virtual Server a year, with a minimum starting point of 10 VIP’s
The Citrix Cloud holds an 99.9% availability SLA
Most of its Citrix Cloud services are departed in datacenters in the United States
This price is per VIP per year based on 3-year annual subscription. 1-3 year subscriptions are available. See here for the annual pricing list of the Citrix Cloud.
Already using NetScaler Gateway, ADC and/or MAS for you’re on-premises environment and thinking to migrate to the Citrix Cloud. You probably can have a discount, Citrix provides a special Trade Up Promo for customers with current XenApp and XenDesktop perpetual licenses.
And last but not least, it is really easy to deploy… See here the official Citrix article for more info.
Did you already know?
Besides the MAS software, Citrix provides a public available online Service Health Dashboard for all their Citrix Cloud services, just to check and see what the status is of the Citrix Cloud services that you are using.
The status page can be found everywhere around the globe at the link: http://status.cloud.com/
Note: Need to receive notifications on updates or intermediate incidents on the platform, through Email, SMS, Slack or by Webhook API – just press the subscribe button in the upper-right corner to add you’re email, for example, to receive any sort of notification.
Infrastructure (Cloud) Dashboard
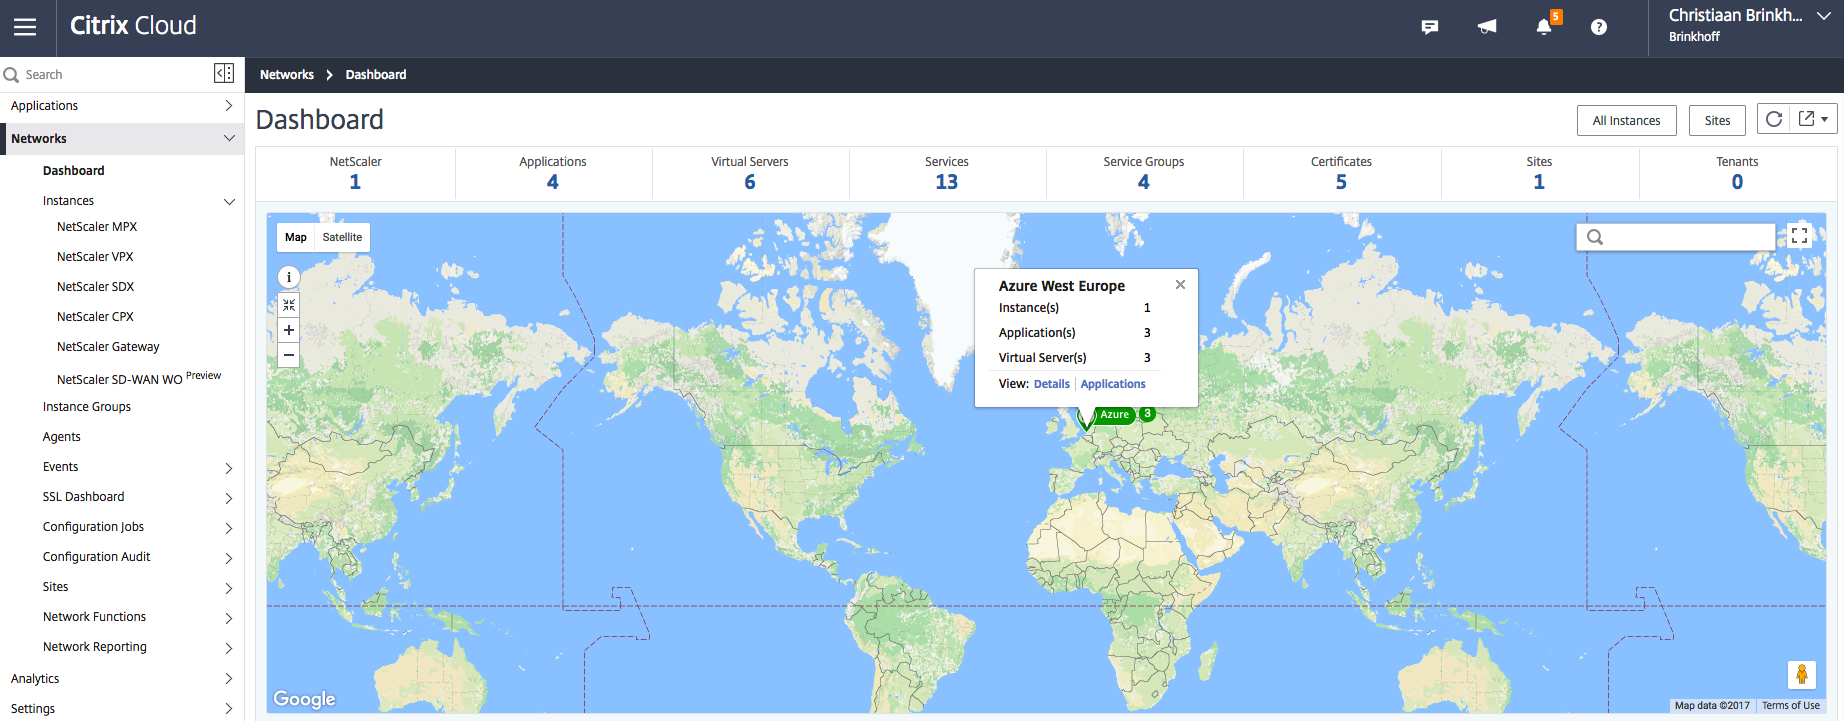
One of the great insight Dashboards of MAS in the delivered from the Citrix Cloud is definitely the global dashboard view. A new method to get a quick insight view about the NetScalers in your (Cloud) environments. Simple in to locate outages or other errors, which can be useful when your company operates globally, on different Public Cloud datacenters!
Note: All the visuals for the maps are delivered from Google Maps.
Register for a Citrix Cloud trial account
Do you want to try MAS yourself? Just to get more confident or just to know more about NetScaler MAS, Citrix also delivers trials to try the services! See the steps below to do so…
Pre-step 1: To get started, you first need to create a Citrix Cloud account, which can be requested through the following url: https://citrix.cloud.com/
Pre-step 2: Enter in all the information – confirm your email address
Pre-step 3: Click on Request – NetScaler Management and Analytics Service– trial

The following screen comes around – with the actual status of the trial request…
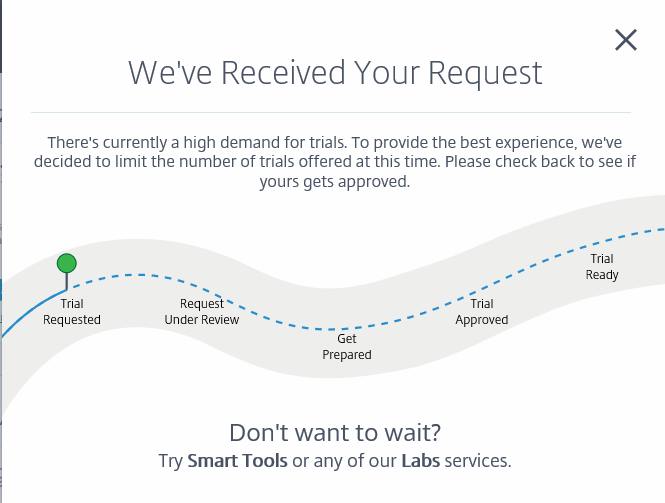
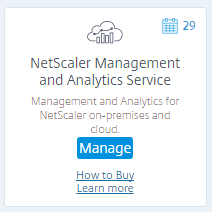
When the icon changes to – Manage – the actual trial is activated and you’re ready to start configuring!
TIP: You can check how many days are left of the trial in the right corner.
Click on the – get Started –button
Add and configure the MAS v12 agent appliance in Azure
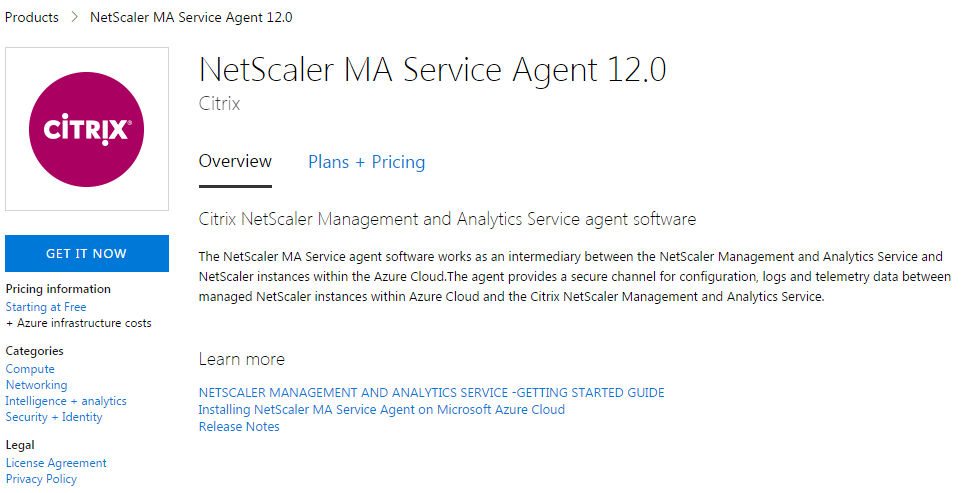
How it works… To connect from the Citrix Cloud to the Azure or Amazon AWS Cloud, Citrix provides the NetScaler MA Service Agent 12.0 from the Azure marketplace. For the on-premises agents, you’ll need to download the Image for the specific hypervisor you’re using.
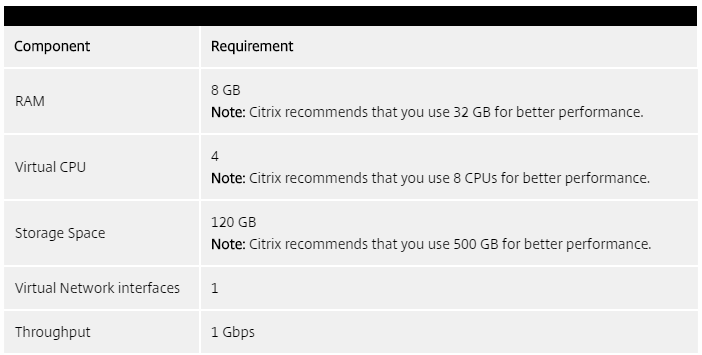
Agent requirements… A virtual machine will be deployed, which required the following minimum System Requirements: 8 GB RAM, 4 Virtual CPUs, 120 GB Storage Space, 1 Virtual Network Interface, 1 Gbps Throughput
Step 1: Install and configure the NetScaler MA Service Agent in the Microsoft Azure marketplace
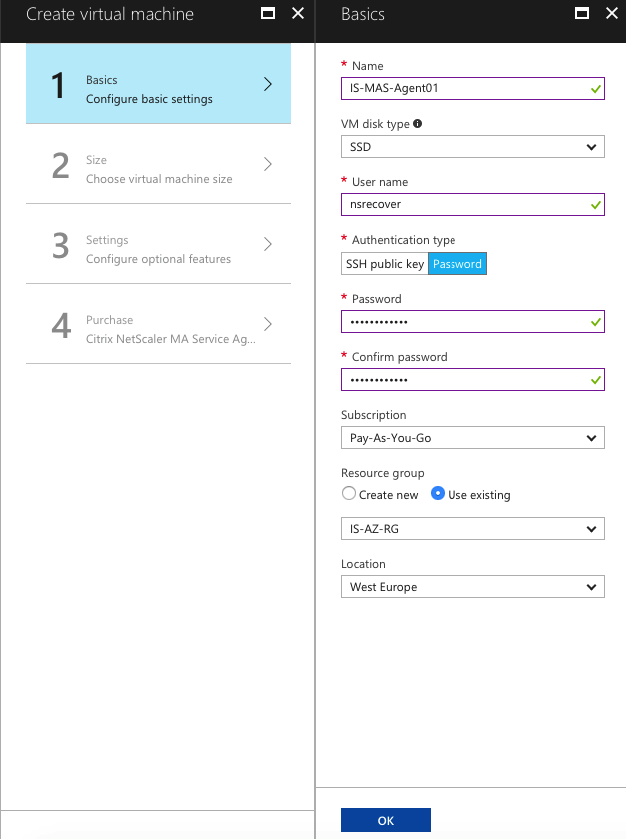
Step 2: Enter in all the required information, the Virtual Machine name, disk type, Power Username and password and of course the Resource group and Datacenter location. Click Ok
Note: You must use the username as nsrecover for all the agents that you install in Microsoft Azure. The password can be random, the default password always be nsroot the first time you access the agent.
Step 3: Select an Azure machine sizing (SKU) for the agent, please use the resources as mentioned below.
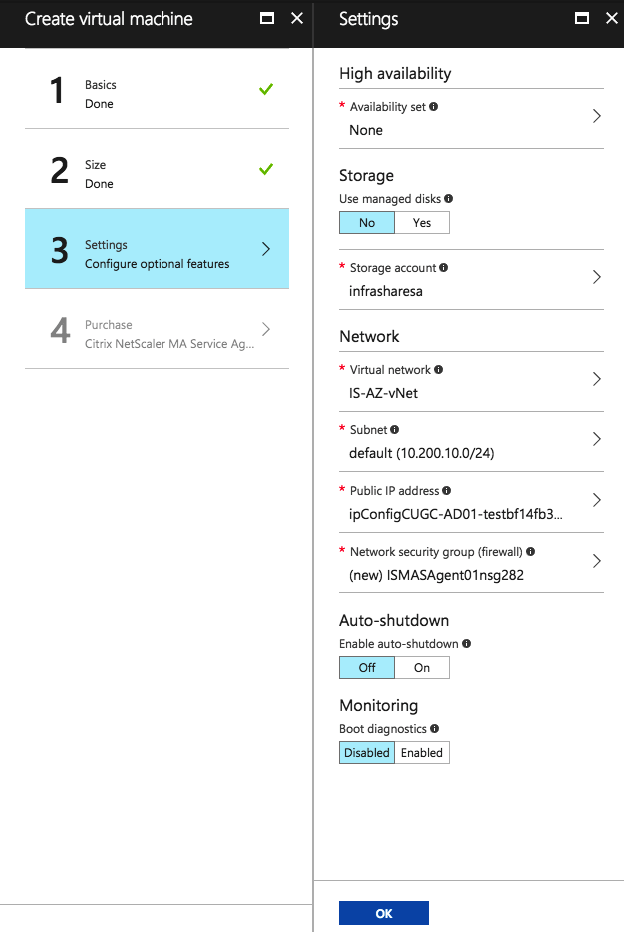
Step 4: Enter in the required settings, use the picture below as example. Managed disks and Boot monitoring is not required. Click on Ok
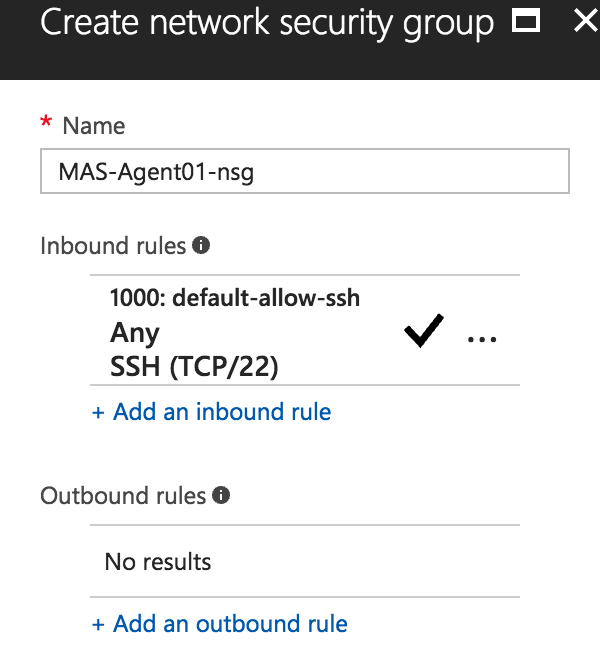
Note: The “create network security group” process will automatically open the requested ports to access the agent after the deployment process.
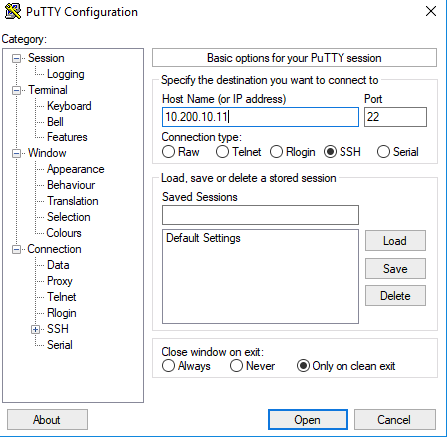
Step 5: Now we need to connect / open a SSH session to the NetScaler MA Agent. Are u using a IPsec or ExpressRoute, please use the private address to proceed the SSH session and use the default nsrecover / nsroot password to get access.
Note: When you haven’t got a VPN, please use the Public IP Address that is attached at the installation process. You’ll can find it at the Network Interface properties of the MAS Agent in Azure.
Step 6: Enter in the username: nsrecover and password: nsroot
Note: Please change the default password through the CLI after your first login. Enter in the following command to proceed this: passwd nsroot
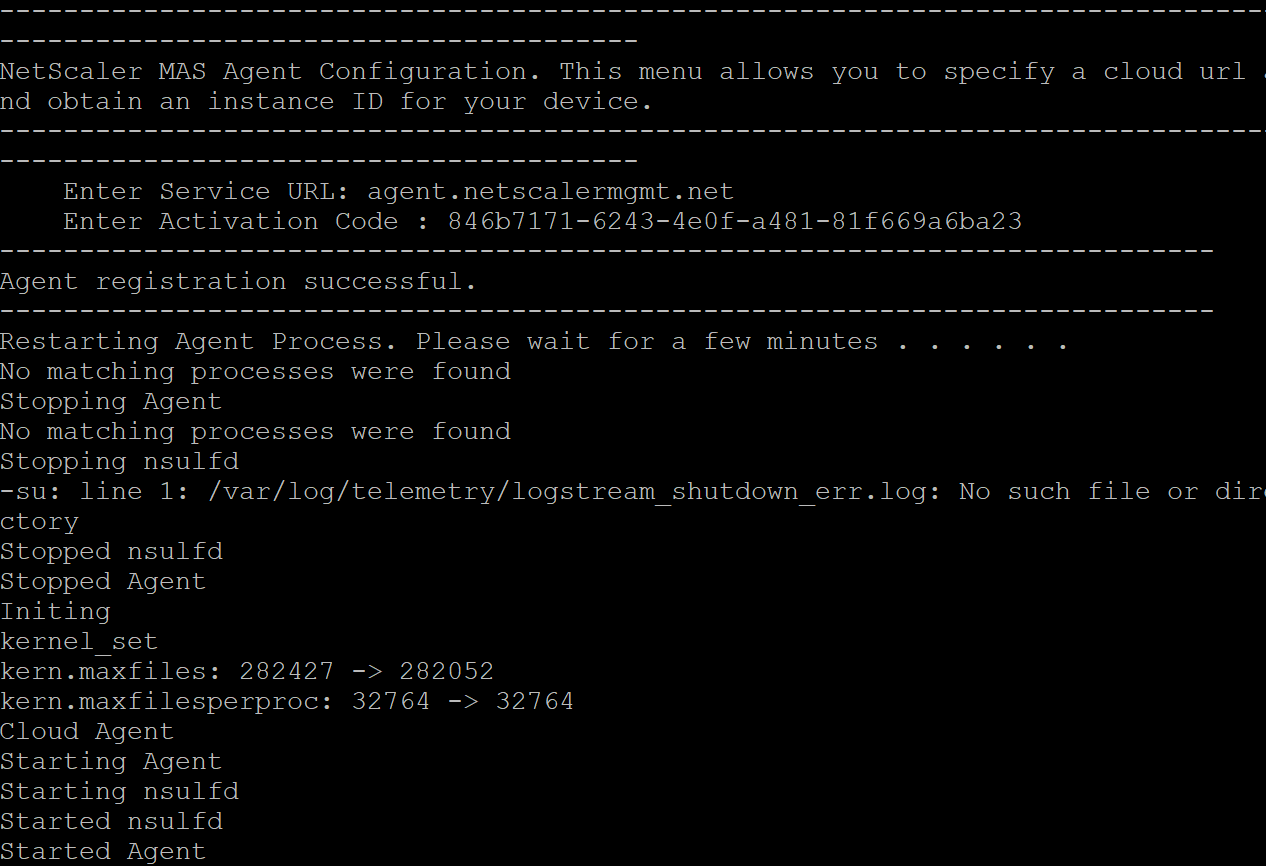
Step 6: Type in the following command to start the MAS Cloud configuration menu: deployment_type.py
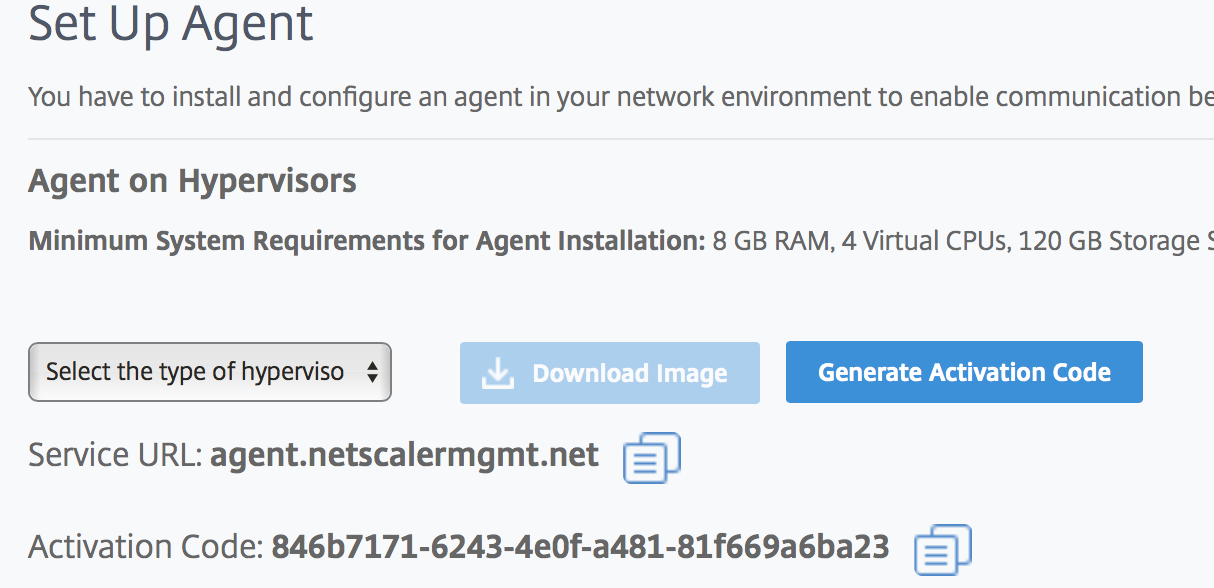
Step 7: Enter the Citrix MAS Cloud Service-URL – agent.netscalermgmt.net– and the Activation code
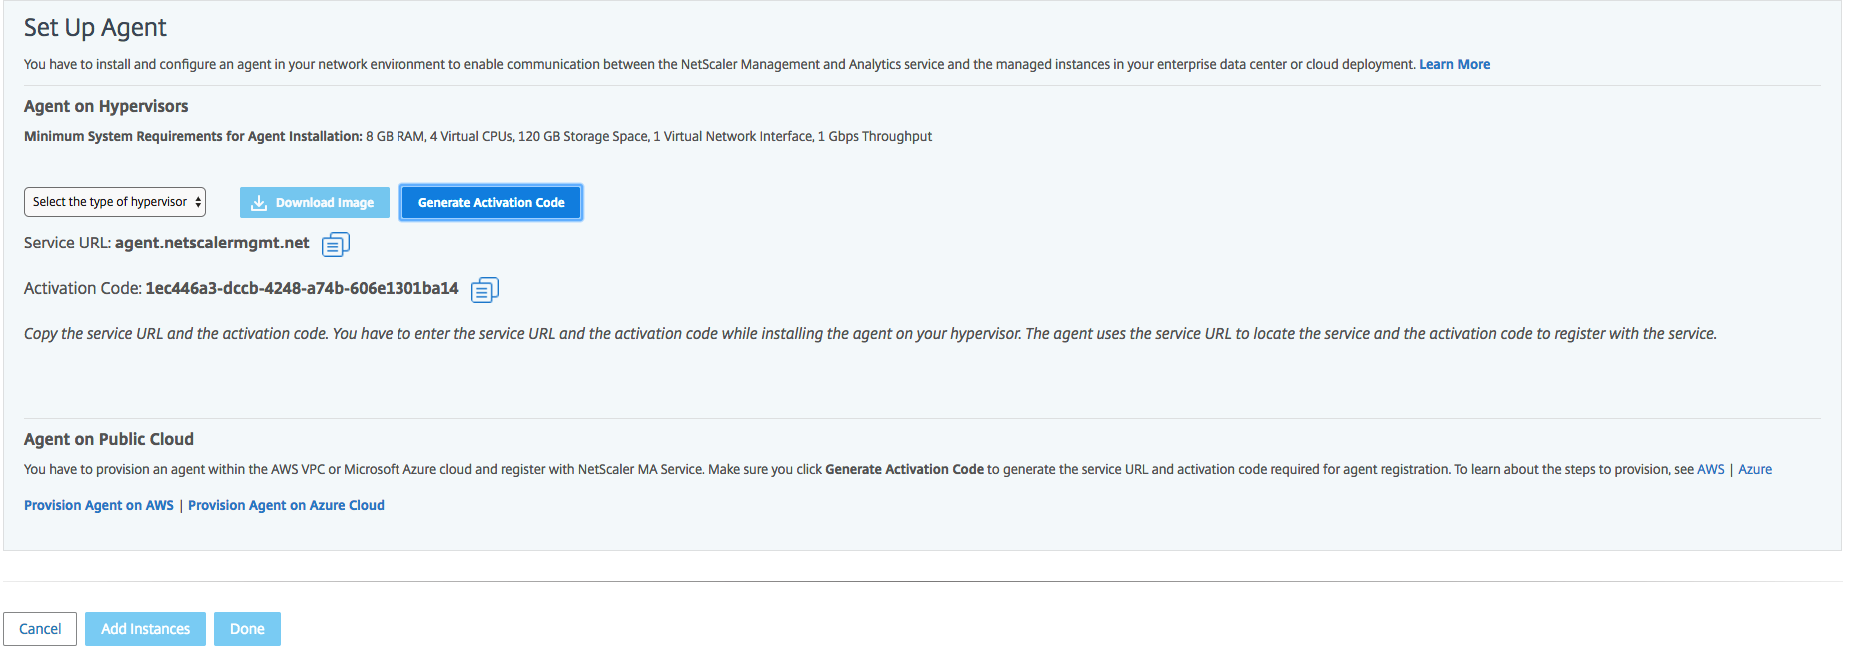
The requested information can be found in the Citrix Cloud portal. Click on Generate Code to receive the Activation code that needs to be entered in the SSH command line.
Note: Need to add more instances, on more Cloud environments, such as Amazon AWS, then simply click on the Add Instances button to generate another Activation Code.
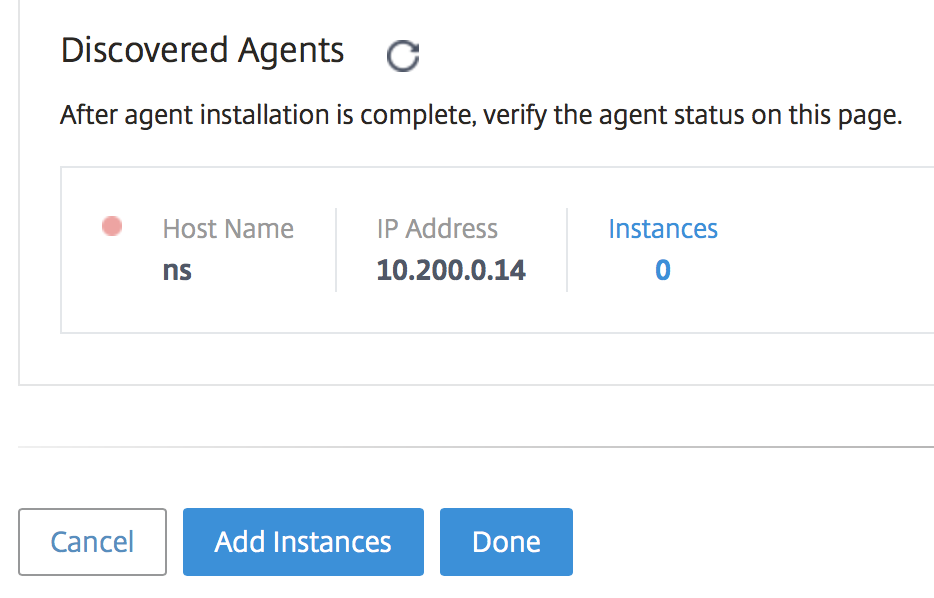
After the process, switch back to the Activation Code screen. If everything went ok, then the Agent is added on the – Discovered Agents – page. Click on Done to switch to the MAS Web Portal.
Add the NetScaler instance in Azure
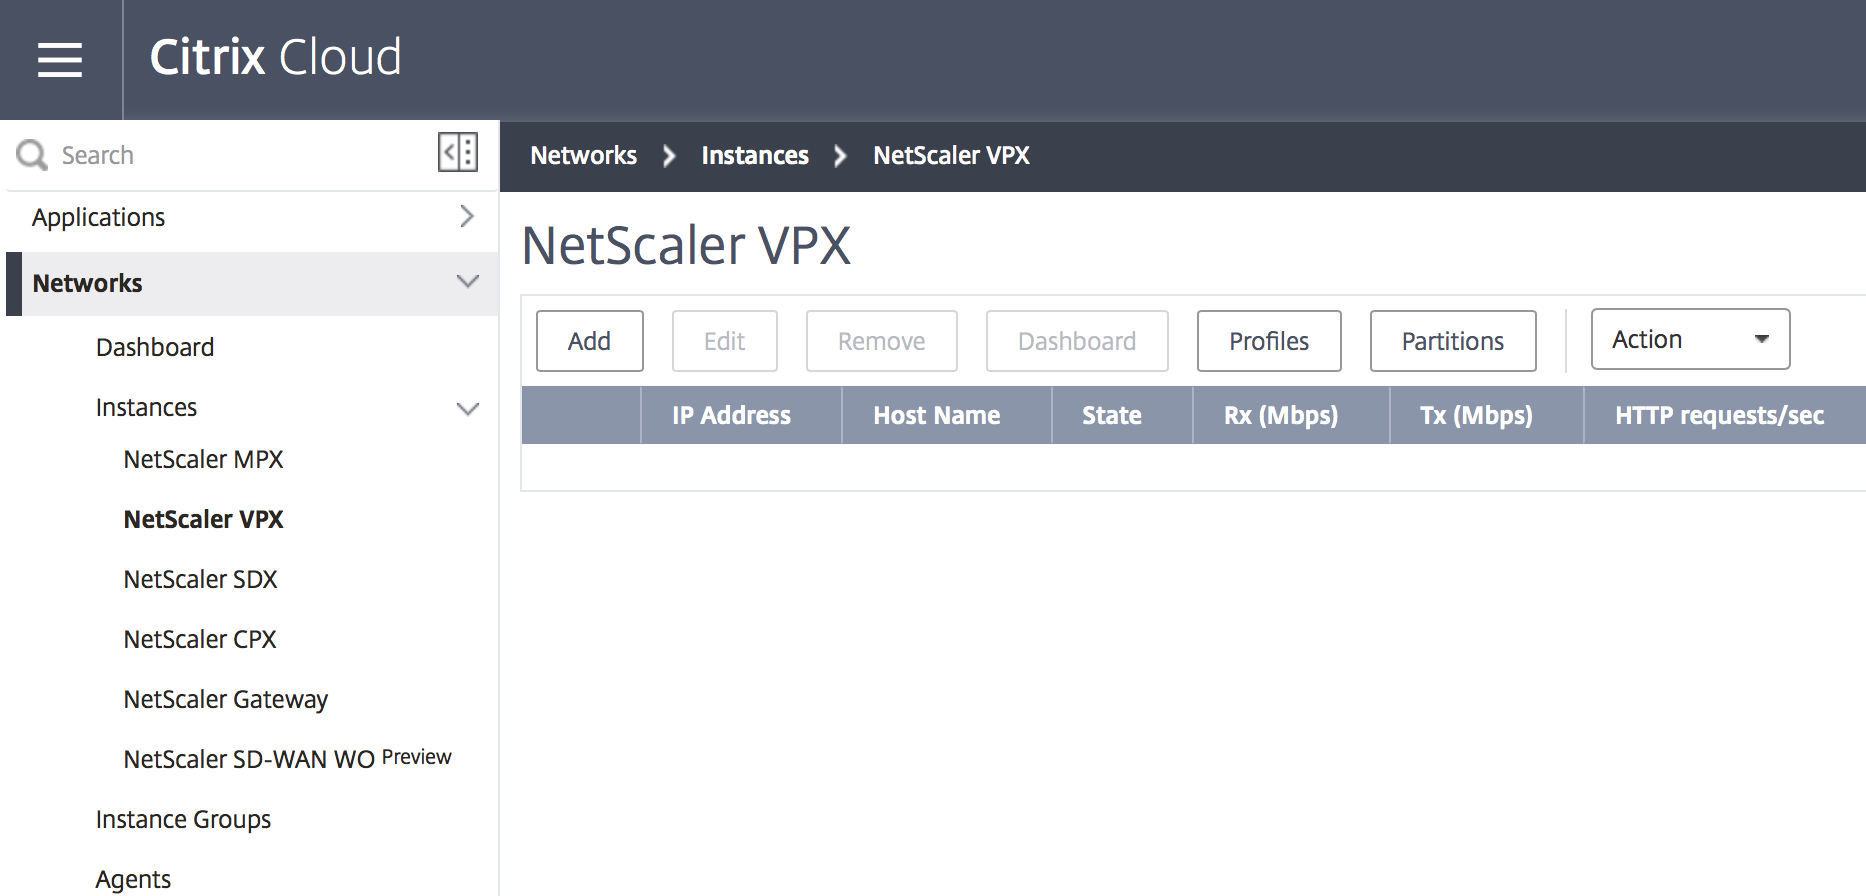
Step 8: To add your NetScaler (virtual) appliance, just open the – Networks – menu option, click on the NetScaler type and click on the Add button
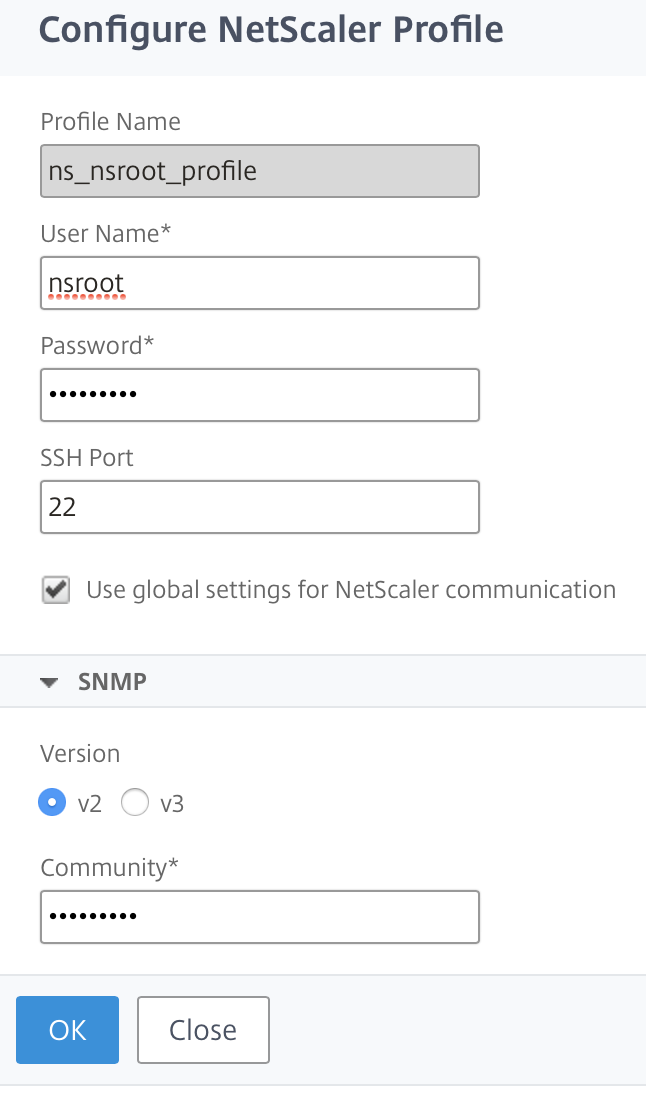
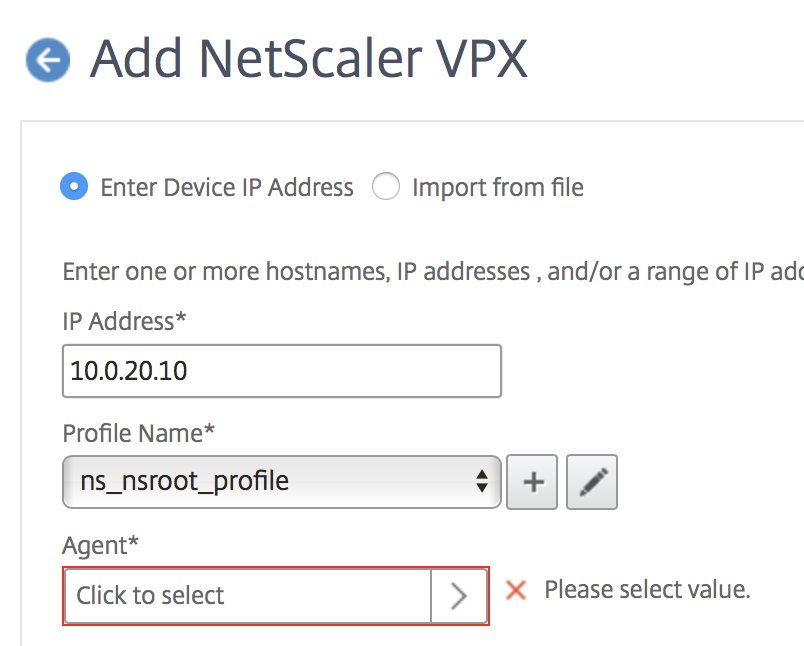
Step 9: Enter in the NSIP (NetScaler IP), and press on the pencil button to add the administrator/nsroot credentials
Step 10: Enter in the account, password and SNMP v2/V3 password. Click on Ok
Now we need to select the agent, just as entry point to connect to the NetScaler in Azure (or any other environment)
Select the Agent, the status needs to be UP
Click on Ok to save the settings and Add the NetScaler
The NetScaler is being added…

When all the steps are performed correct, the VPX must now be listed with the status UP
Add IP Blocks and Sites
To determine the locations of the NetScaler your using, and localize the appliances on the Dashboard it is required to add the network addresses on the IP Block and Sites list. The dashboard will know where to put the indicator on, which can be useful for the monitoring globally through one dashboard – monitoring display TV, for example.
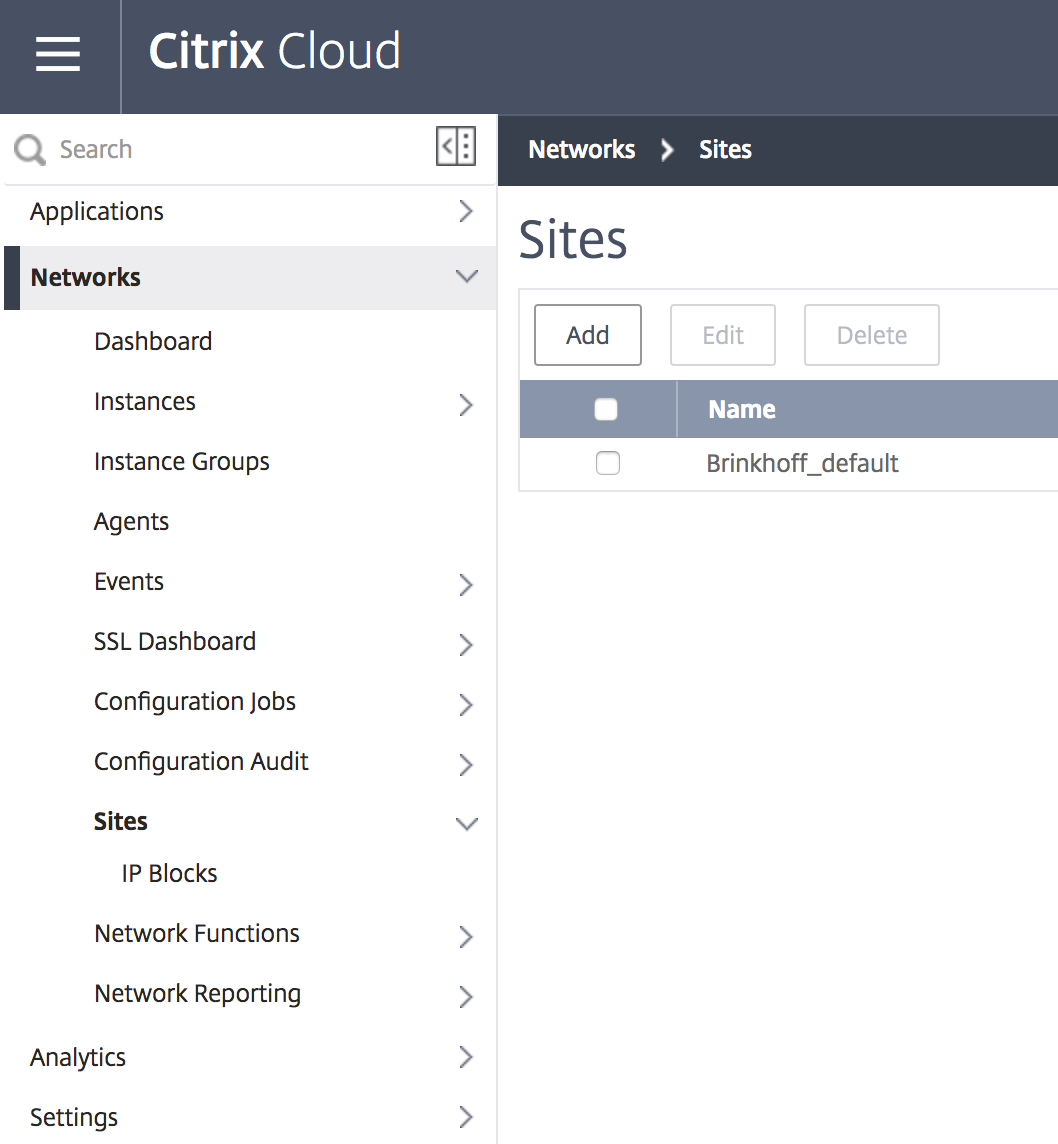
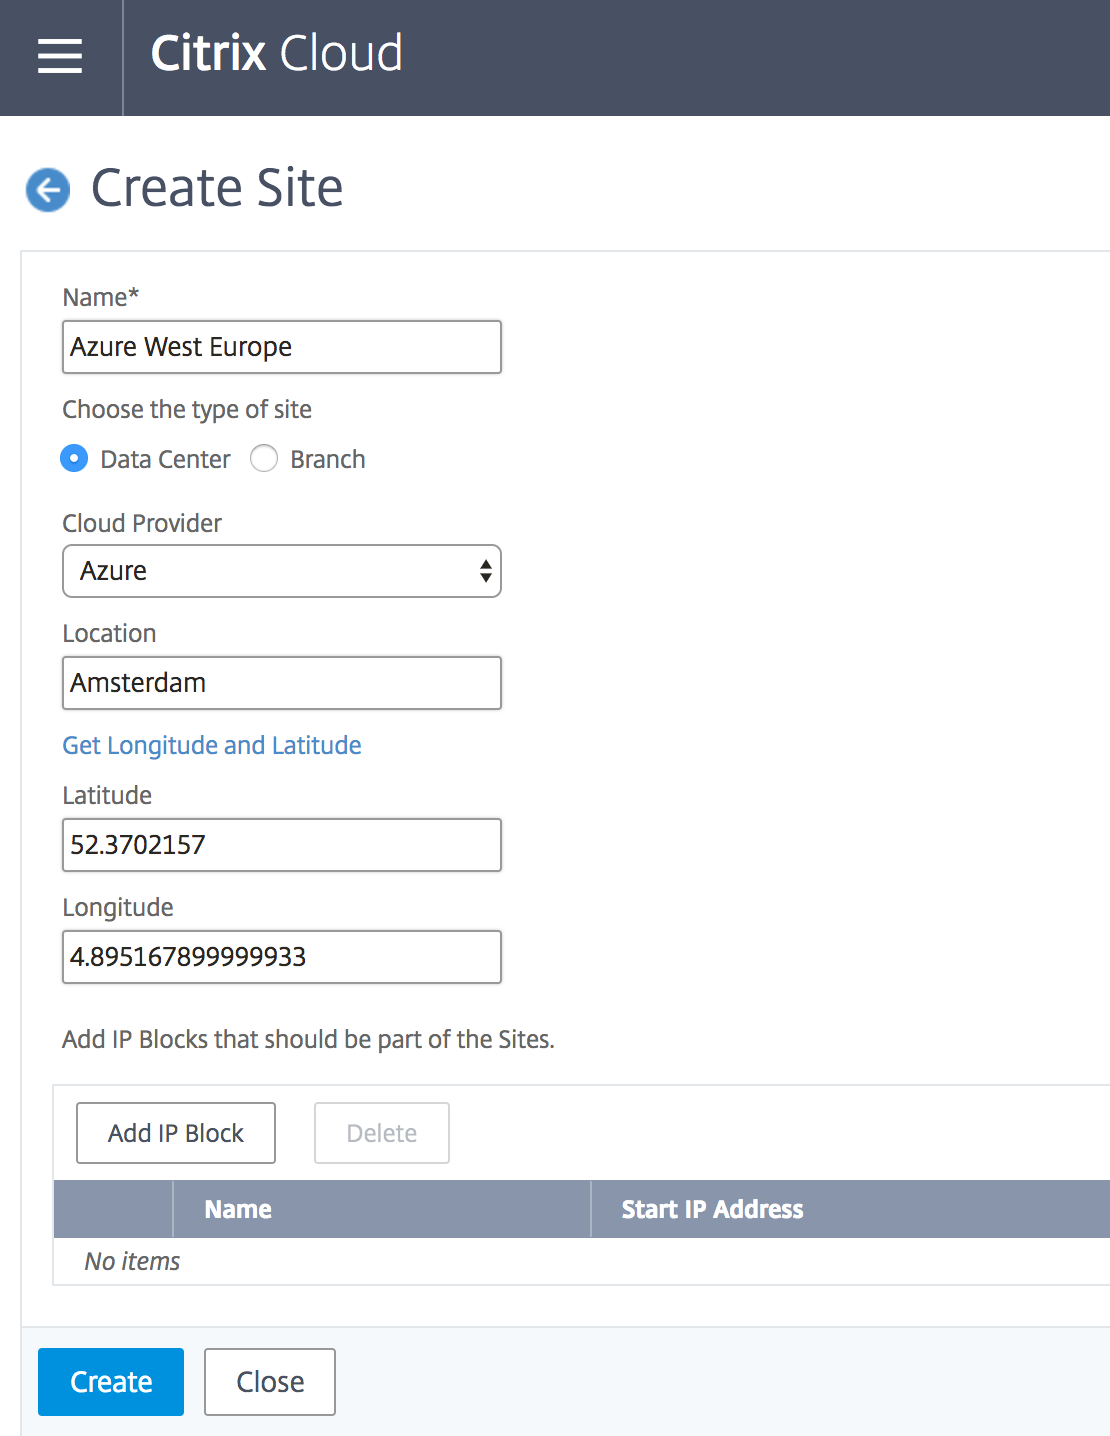
Step 11: Go to Networks -> Sites and click on Add
Note: organizationname_default will be listed as standard. You can’t / are not able edit this.
Step 12: Enter in a Site name (that will be listed in the Dashboard), Cloud provider, location and click on the – Get Longitude and Latitude – option to receive the coordinates. Click on – Add IP Block – to add the IP range of your NetScalers
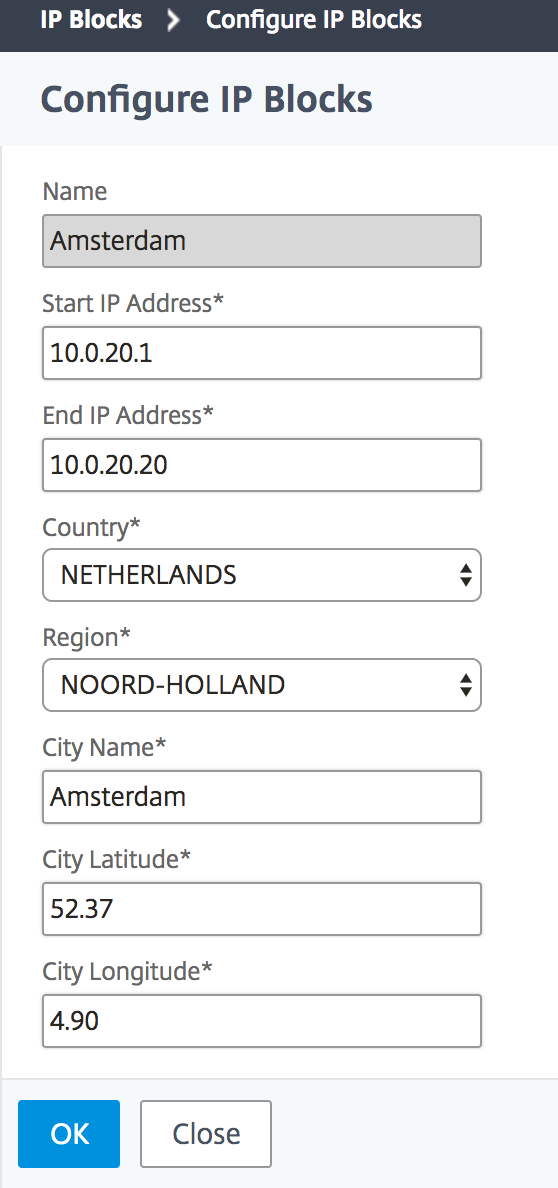
Enter in the Name and the IP range to discover your NetScalers. The other required information is needed for the localization
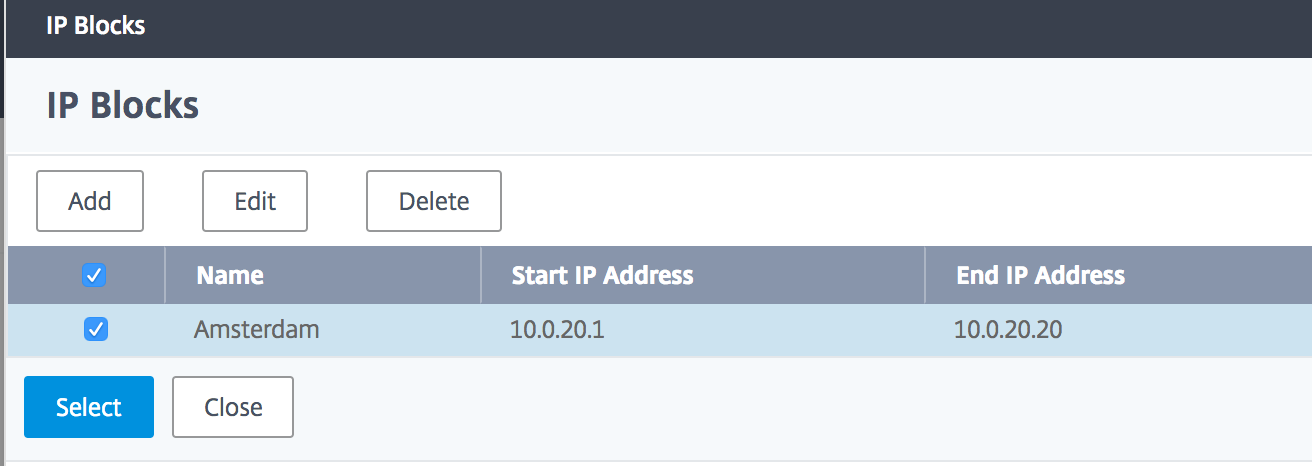
Untick the checkbox of the IP Block and click on Select
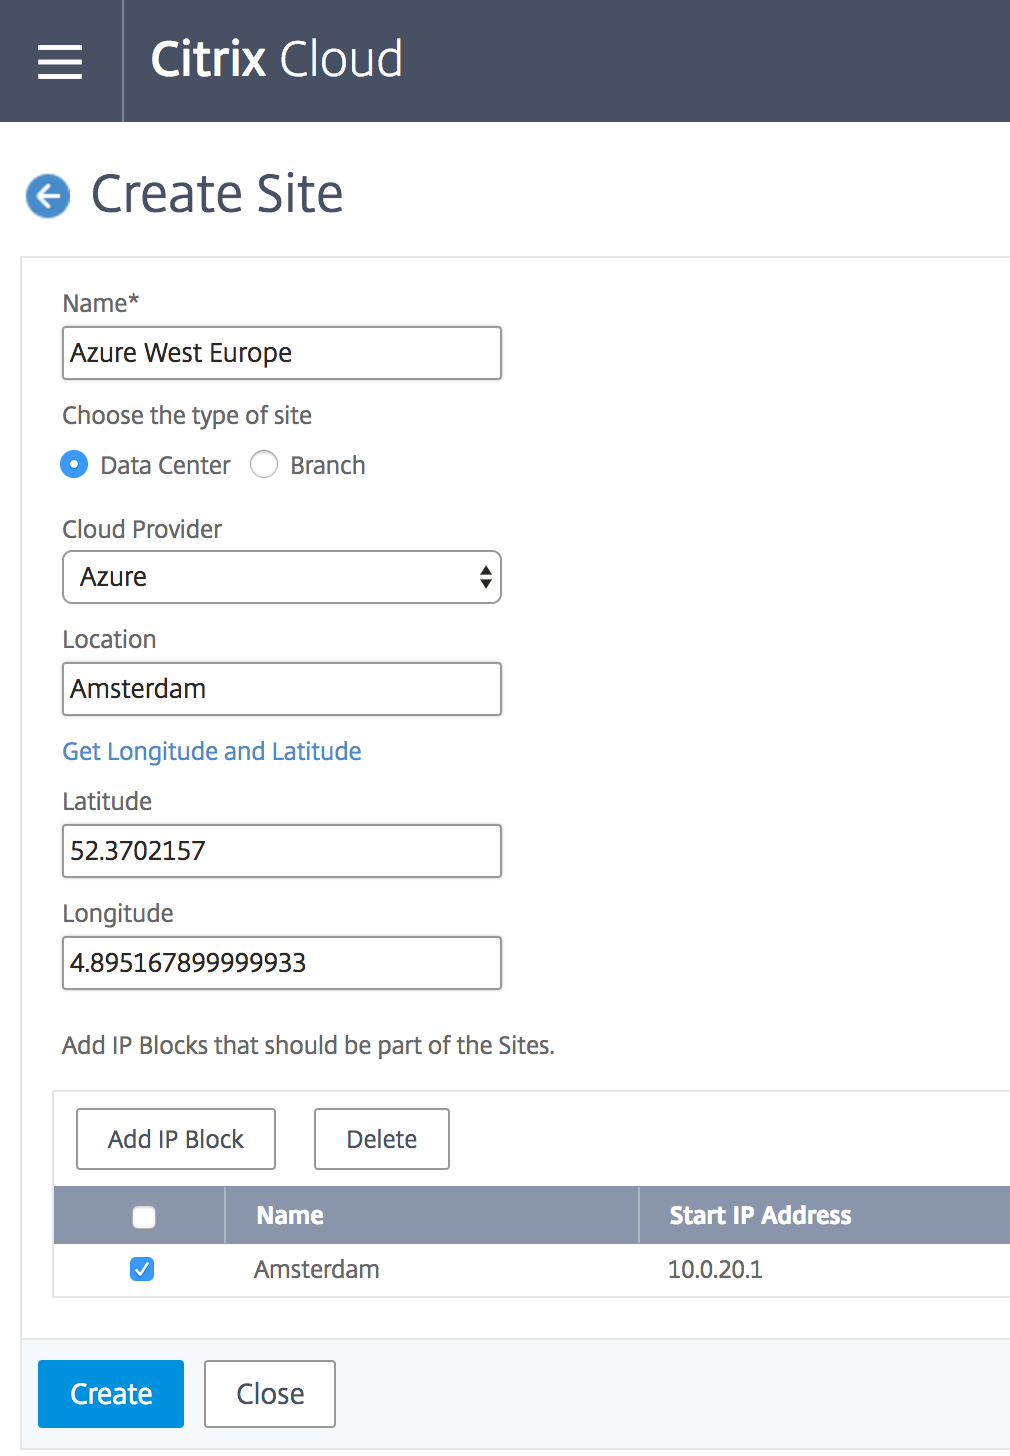
Click on Create to finalize the process
The networking Dashboard will eventually look like this, pretty slick, right?
SSL Dashboard Menu
Here you can see details on all the SSL Certificates that are currently available on the system with important information about them such of expiration times and public vs self-signed keys, etc. Very useful, just to get a fast and clear view of all the certificates that your using!
Upgrading your NetScaler(s) via NetScaler MAS
NetScaler Management & Analytics System (NMAS) has the capability of upgrading a NetScaler appliance or a set of appliances. We can choose to perform the upgrade immediately or at a designated time. This can be very useful when using a HA and/or cluster setup. MAS will take care of the secondary and failovers automatically to do the primary. An administrator’s life can be simple sometimes…
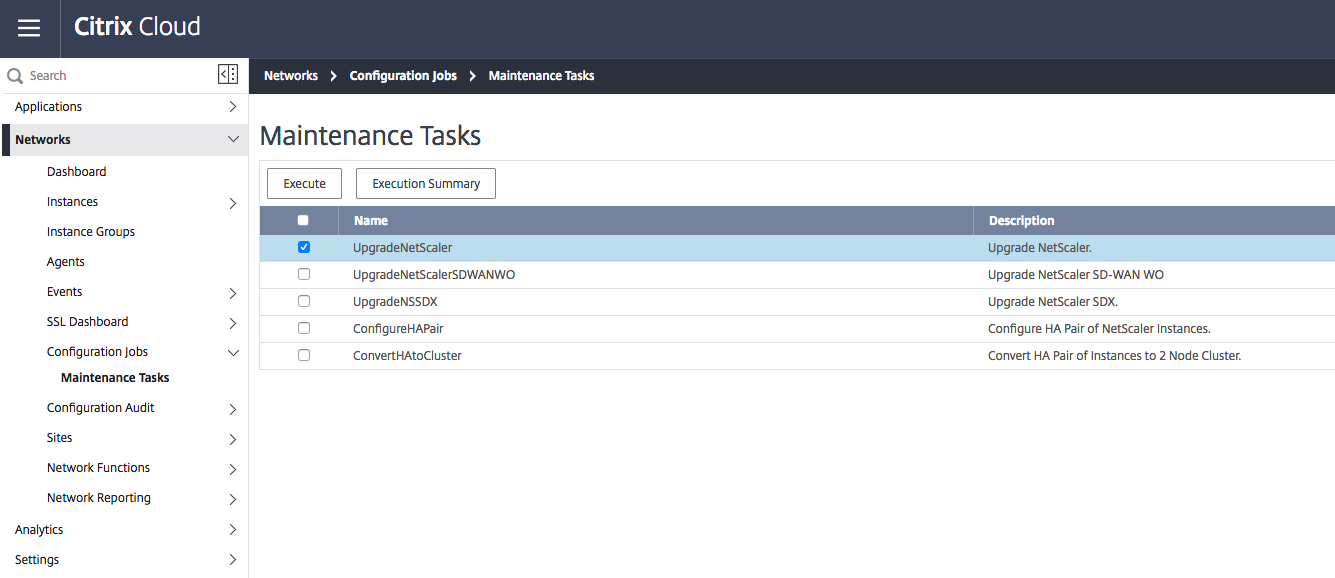
Step 13: Open the Networks -> Configuration Jobs -> Maintenance Task option – select the UpgradeNetScaler job and click on Execute
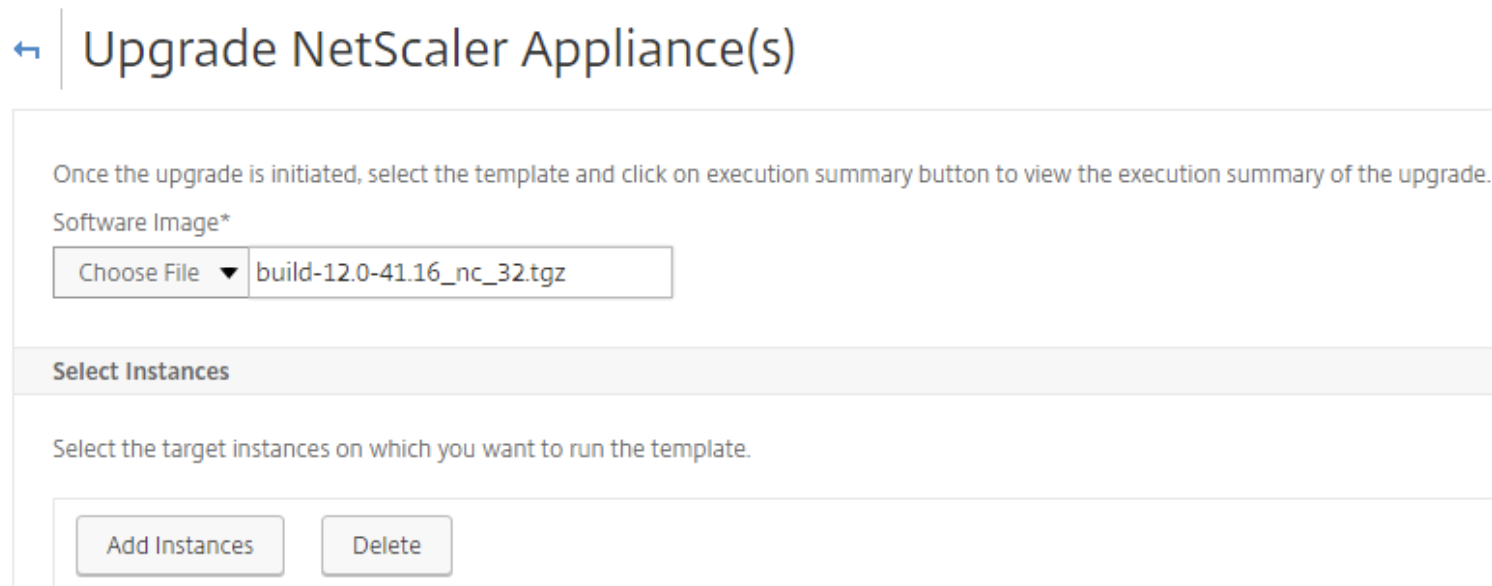
Step 14: Click on Add instances and select all the NetScaler you want to upgrade
Step 15: Click on next – wait for the validation

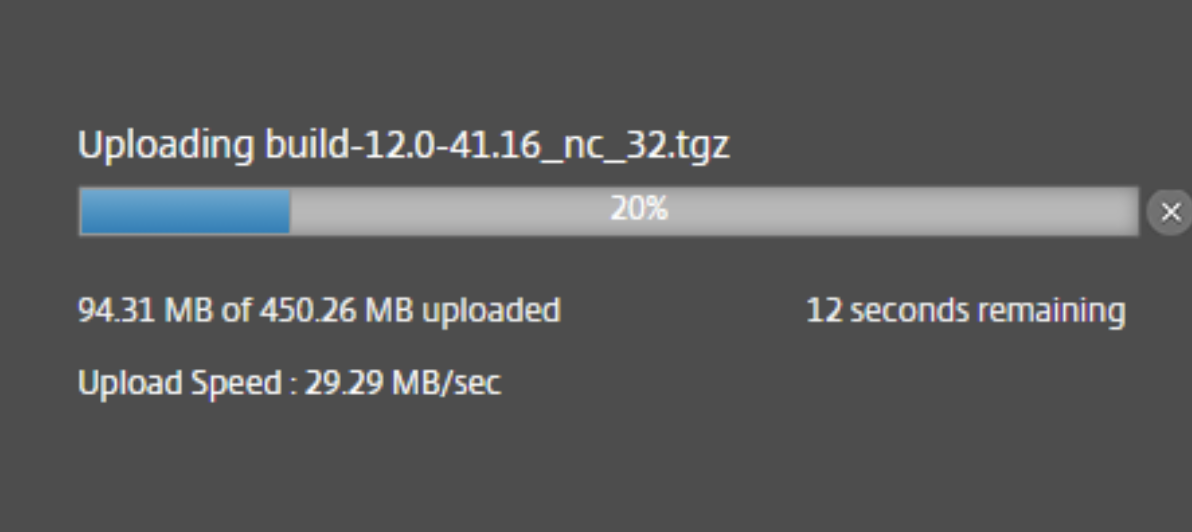
Step 16: Select the Firmware build
Step 17: Upgrade – firmware is being deployed
Master Configuration
NetScaler Management and Analytics System can help to improve configuration workflows by automating NetScaler systems. One of NetScaler MAS’ mechanisms to do so is called Configuration Jobs. We can create custom configuration jobs to perform virtually any NetScaler centric task on demand to a set of NetScaler appliances or schedule a task to be ran at a given time.
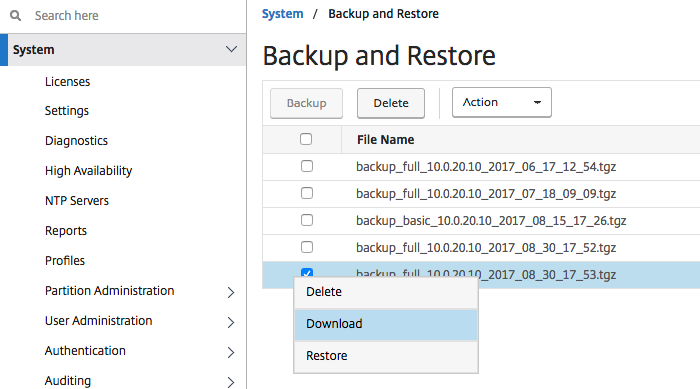
Step 18: First create a Configuration Template file and an input variable .xml or .csv file. The best way to do this is to open the Web GUI of the source NetScaler, which holds the MasterConfig and download the latest config on the Backup and Restore section
Step 18: Extract the package and open the ns.conf file
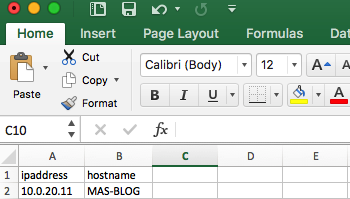
Step 19: Replace all the IP Addresses or/and others that you want to make variable to something like – $variableName$. For this example, I’ll just edited the IP Address and Hostname. Save the file as MasterConfig.conf
Now we need to create the variable file, this needs to be a .xml or .csv file.
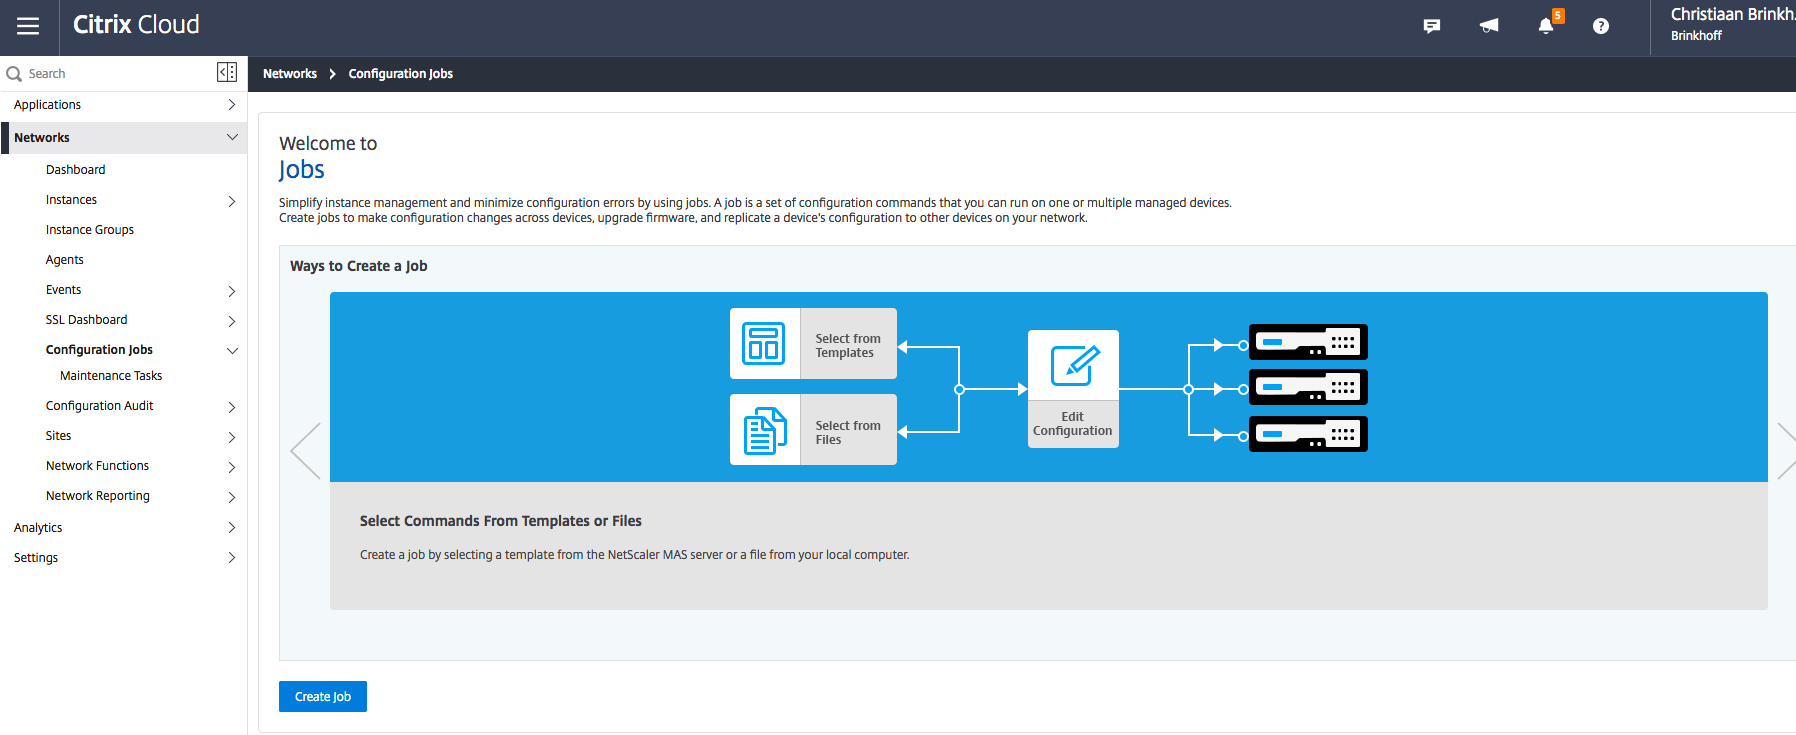
Step 20: Open the Configuration jobs option in the Networks Menu section, Click on Create jobs to start
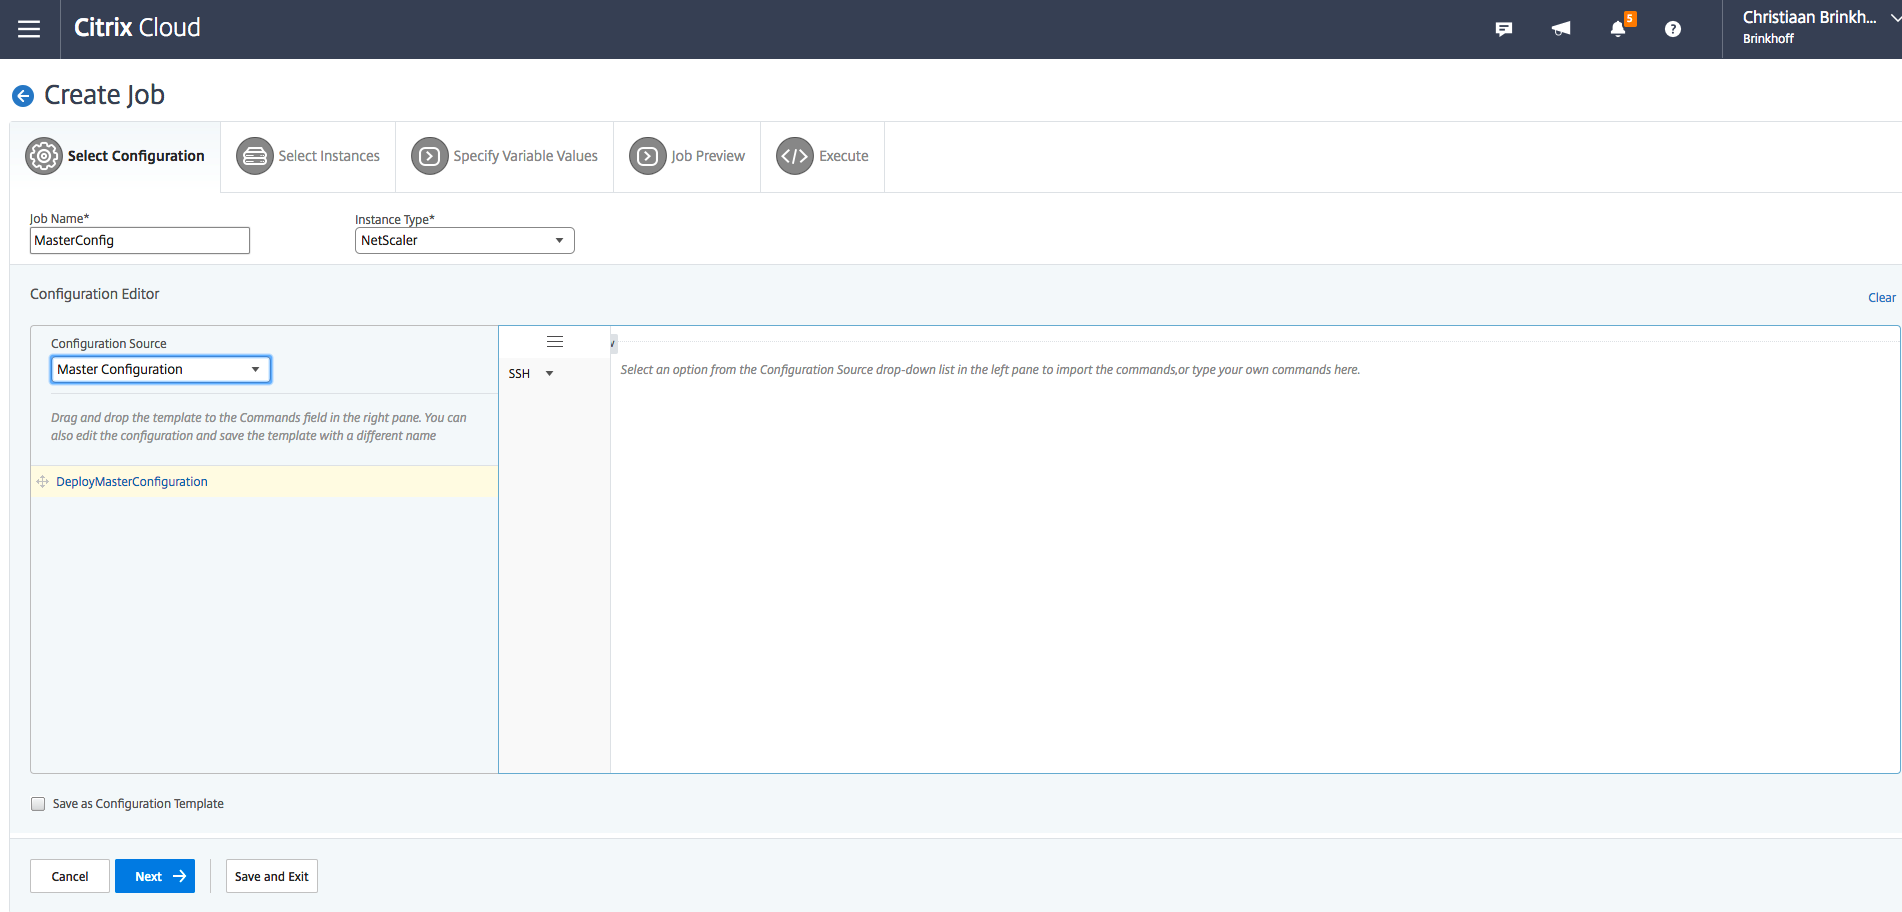
Step 21: Enter in a Job Name, select NetScaler as type and Master Configuration as Configuration Source. Drag the DeployMasterConfigurationto the white open field and release the mouse button
Note: Here you can see the commands that NetScaler MAS will run on each instance we select to run this Configuration Job on. These commands will make a backup of the current ns.conf, generate the master configuration from our inputs, place that new ns.conf into the NetScaler and reboot.
Click Next to continue

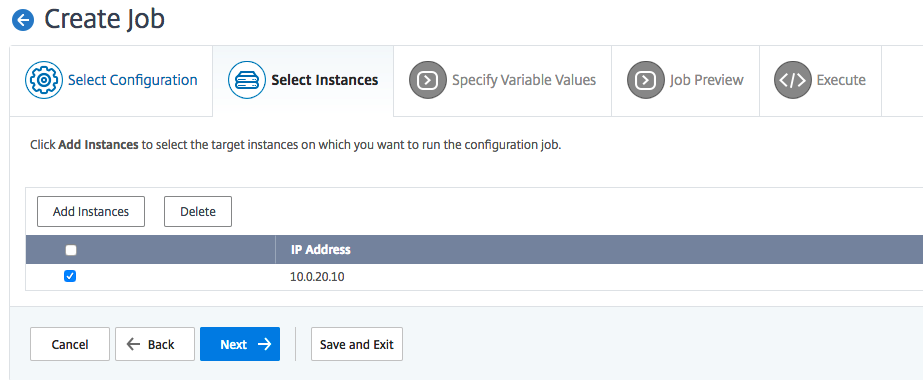
Select the NetScaler instance
Click on Next
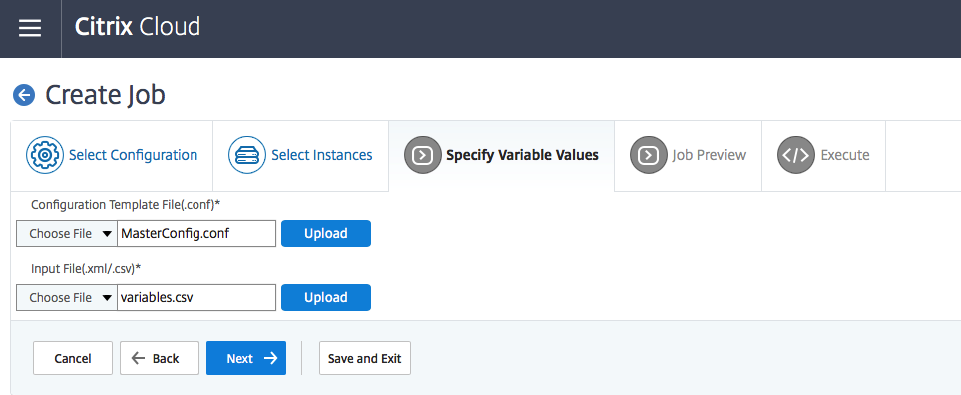
Selectthe created MasterConfig.conf and variable CSV file – Click on both upload buttons to upload the files to the NetScaler. Click Next
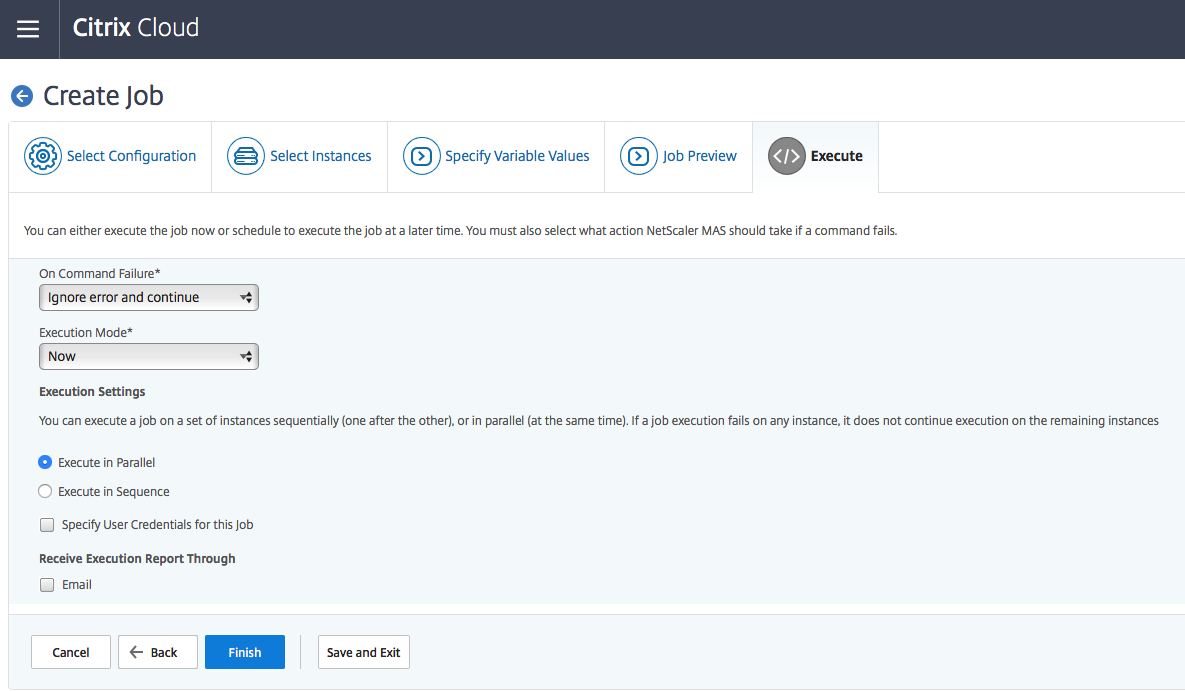
Click on Finish to Execute the Master Configuration
Stylebooks
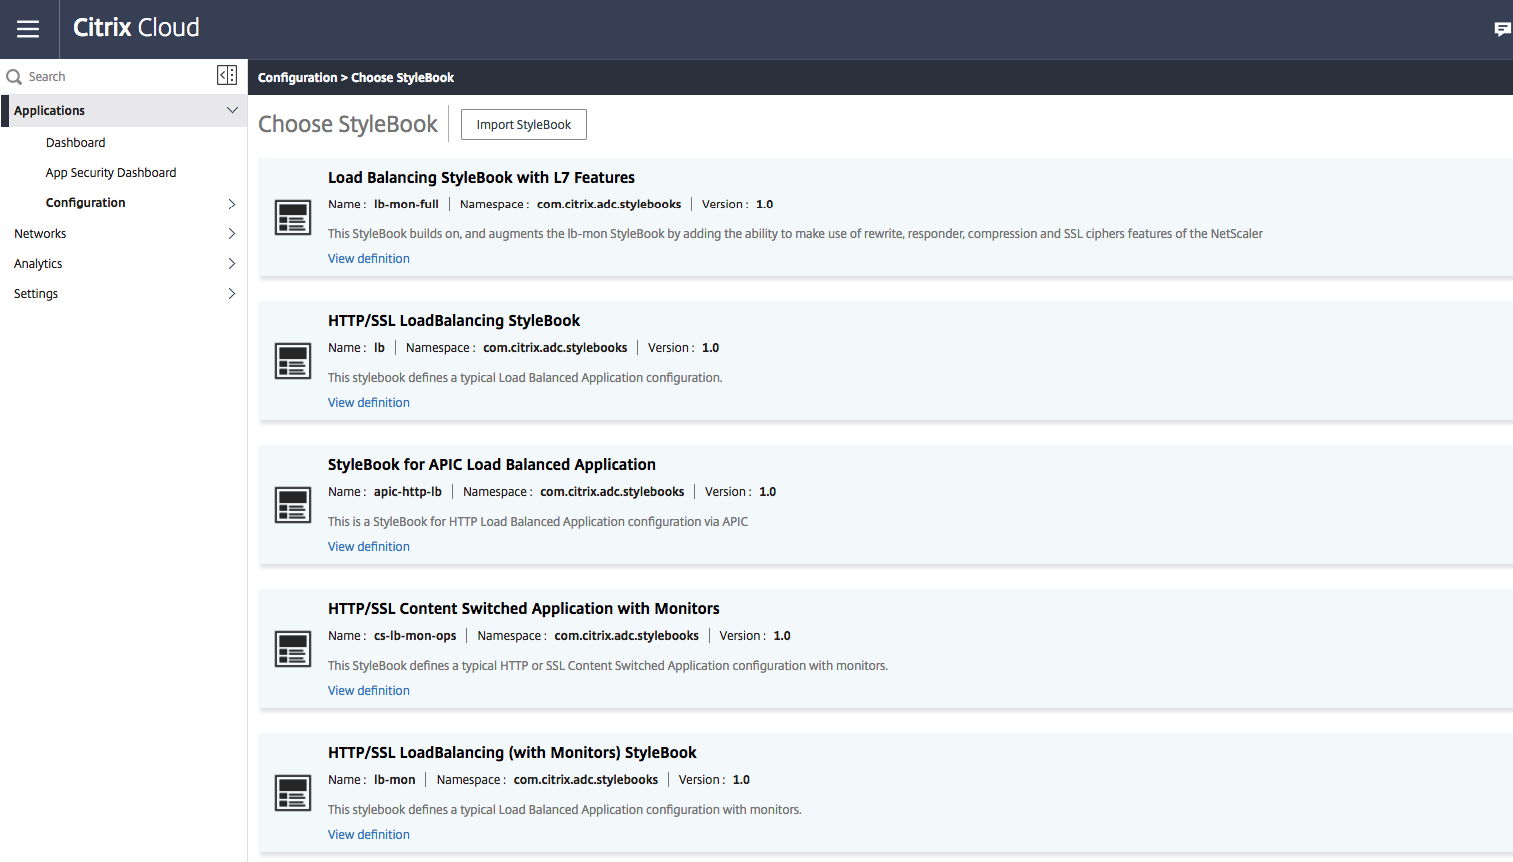
A StyleBook is a template that you can use to create and manage NetScaler configurations. This can be useful to enroll a fast NetScaler GSLB or Content Switching configuration, just fill in your instances with several variables and your good to go!
Step 22: Stylebooks van be found under the Applications -> Configuration. Click on Create New and select the Stylesheet – to open the rollout wizard
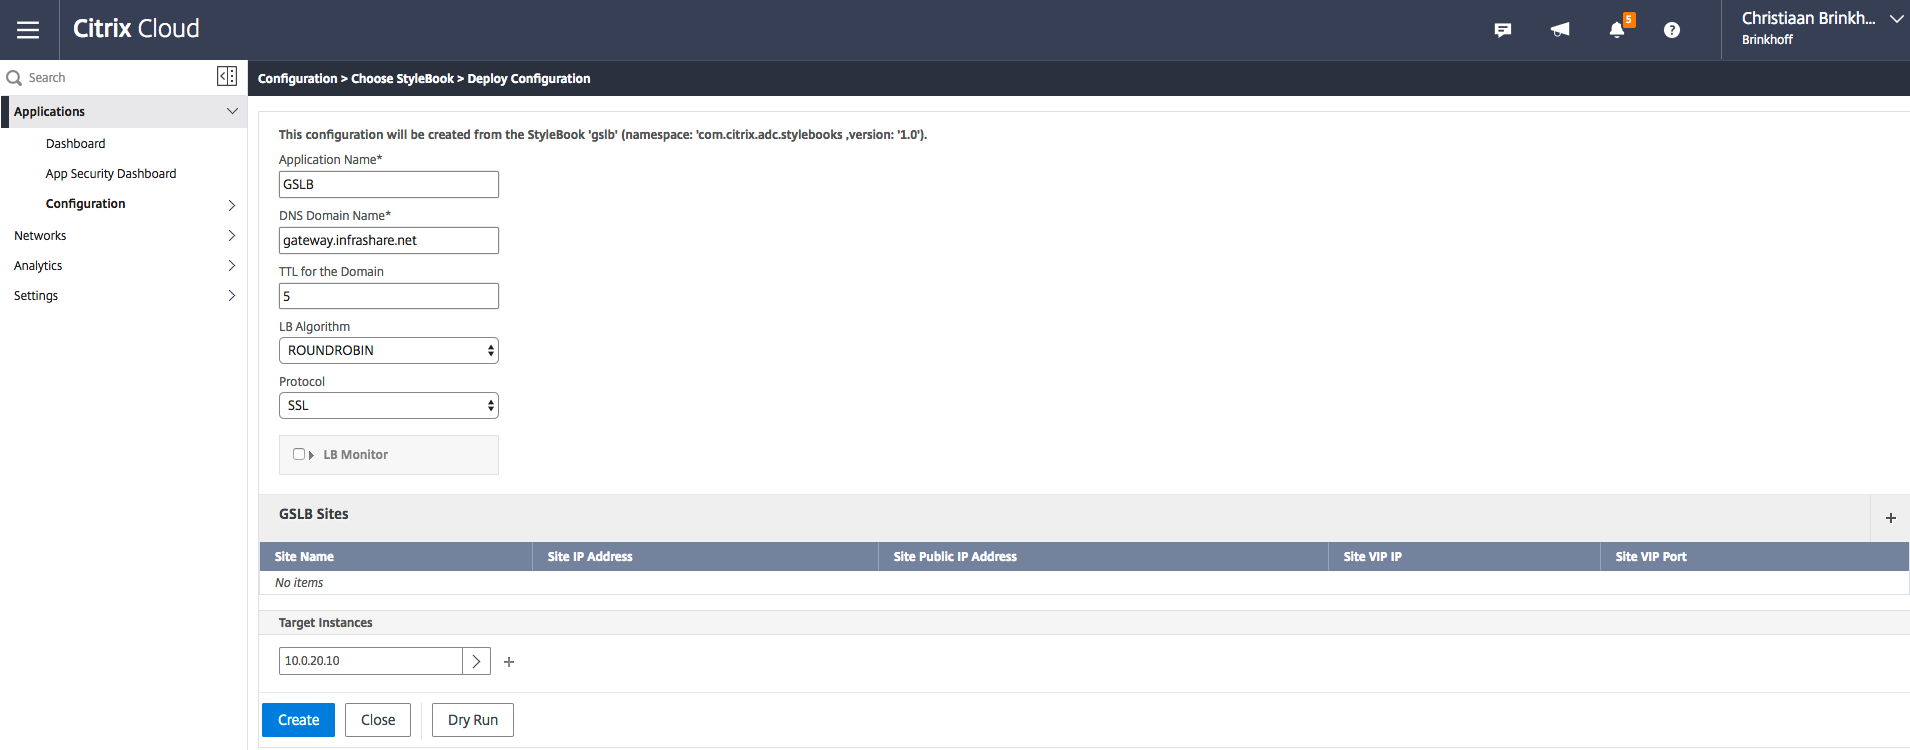
Step 23: I’ll used the GSLB Stylesheet for this article. Just fill in the required variables and select the instances to roll out the configuration. It’s just as simple as 1-2-3…
Note: Just perform a dry run to test the connection first.
HDX Insight and GW Insight for XenApp and XenDesktop ICA sessions
Gateway customers who need visibility to their XenApp or XenDesktop HDX traffic and troubleshoot access and authentication issues (HDX Insight and Gateway Insight are both included in MAS). What actually means that you can activate the Networking TAB menu in the Director and the traffic flow of your NetScaler Gateway / ICA Proxy will be actively be monitored.
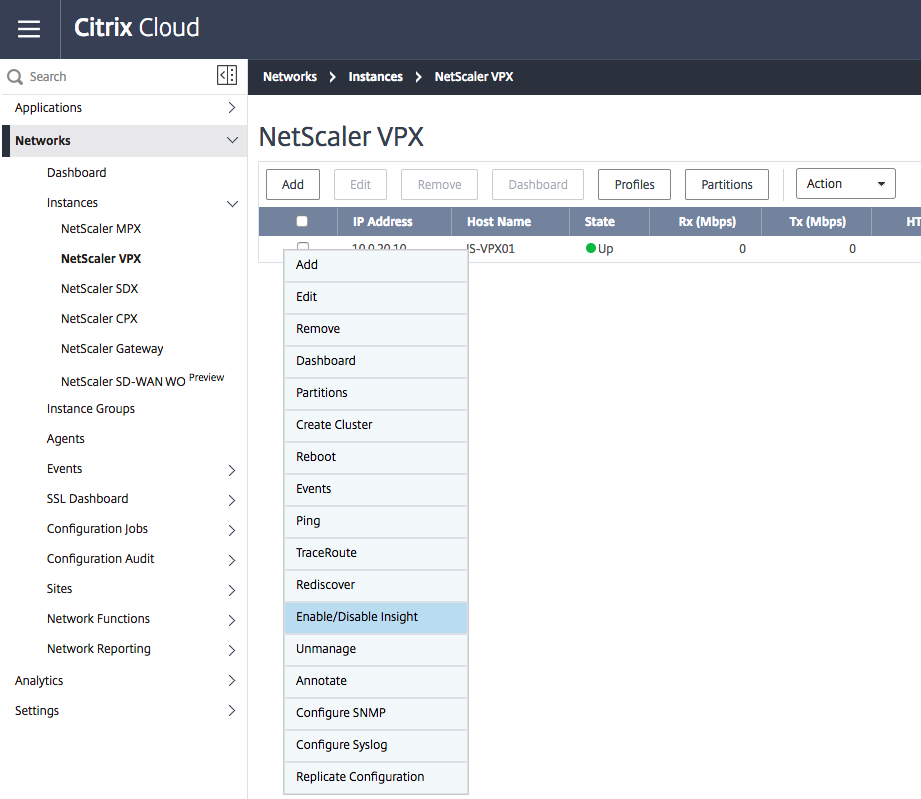
Step 24: Open the Network -> Instances -> NetScaler VPX menu and right click on the entry. Click on Enable/Disable Insight
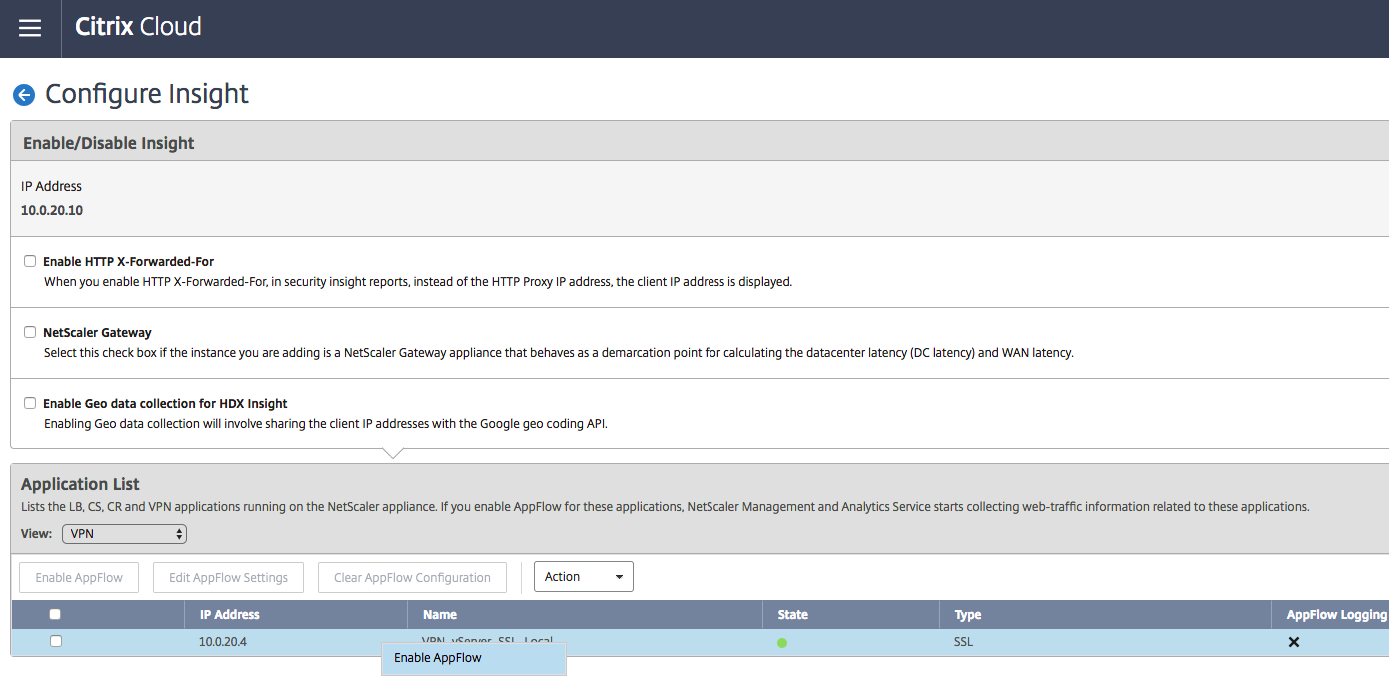
Step 25: Select VPN in the Applications list. Click on the VPN Virtual Server and Enable AppFlow.
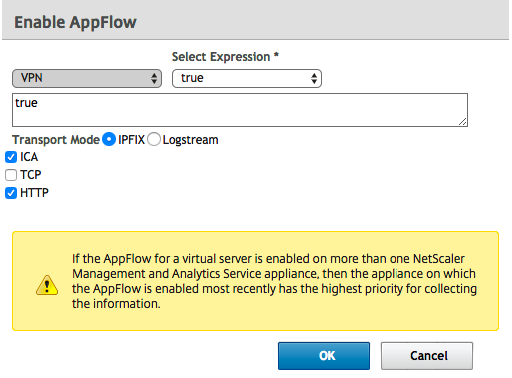
Step 21: Enter in the following settings, Click on Ok
Make sure that the AppFlow Logging checkmarks comes around afterwards

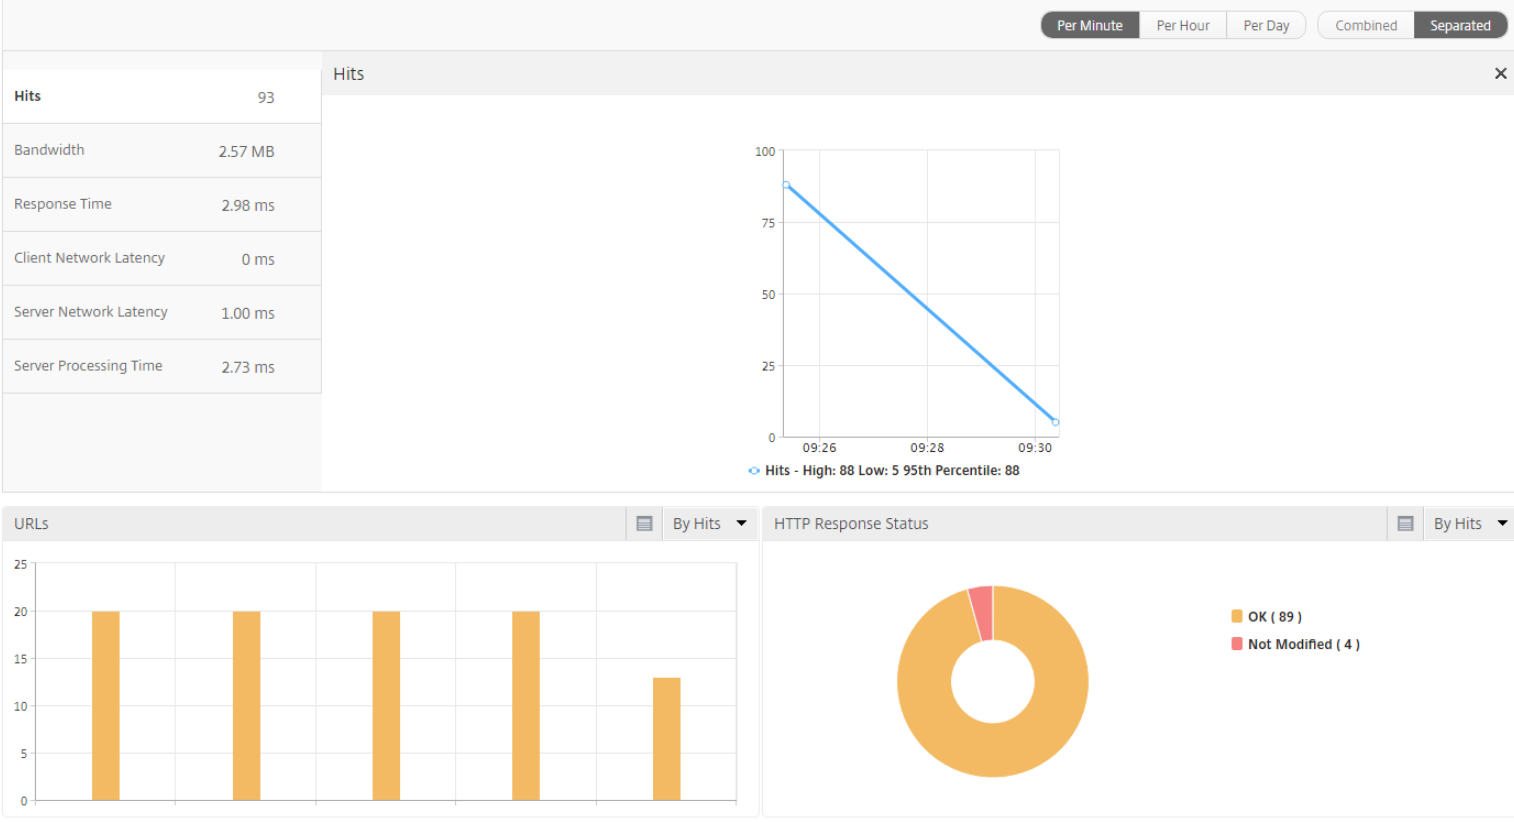
You can repeat these steps for other normal Virtual Servers or the internal StoreFront Load Balancer, just to read out the traffic flows, response times and latency information!
To check / read out this information, go to the Analytics menu and open the HDX / Gateway insights menu
Now you have a fully pre-configured NetScaler MAS which operated and managed from inside the Citrix Cloud, maintained by Citrix!
















No comments:
Post a Comment